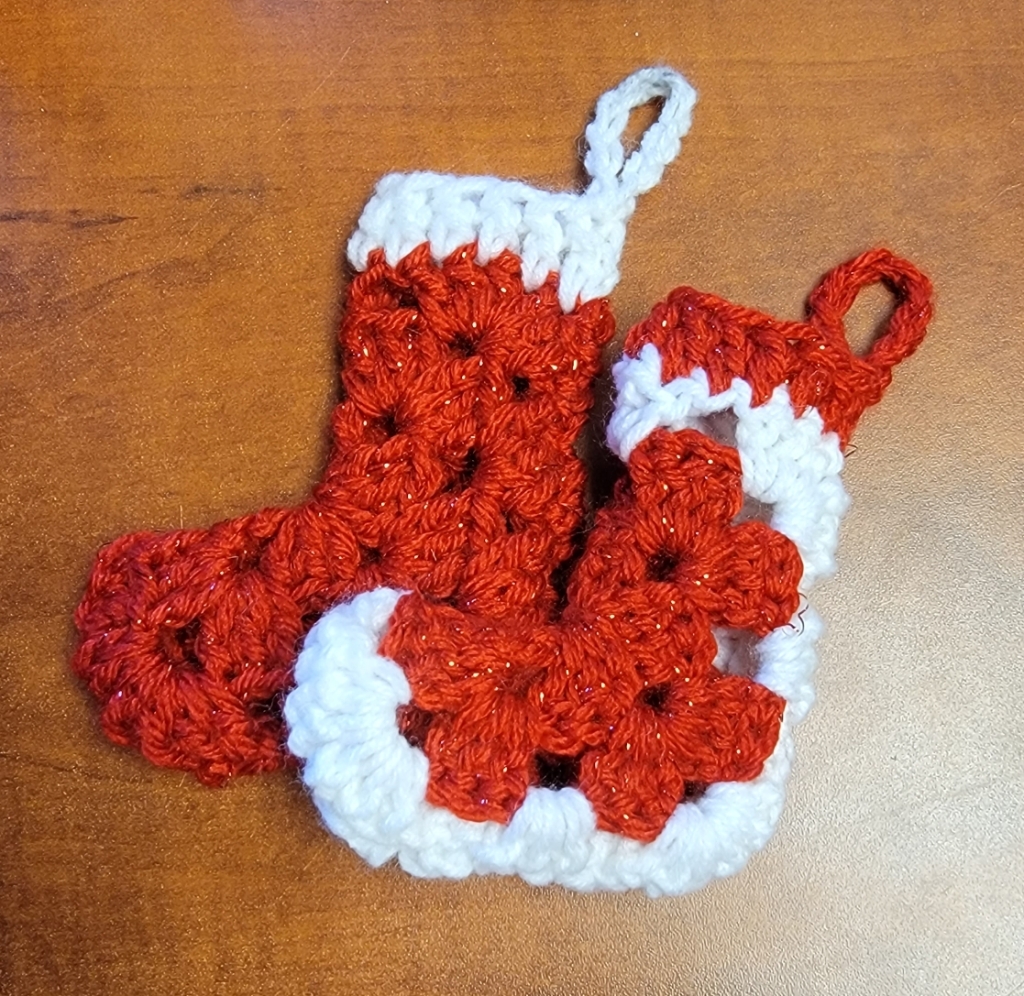
These mini Christmas stockings make great decorations, gift bags for mini candies, handouts for coworkers, or holiday teacher gifts!
Each stocking takes approximately 20 minutes or less to make. This also makes a great stash buster project!
Scroll down for the free pattern, or visit my Etsy or Raverly shop to purchase a downloadable copy!
Materials Needed:
4mm Crochet Hook
Tapestry Needle
Worsted Weight Yarn
Scissors
Abbreviations
CH – Chain Stitch
DC – Double Crochet
SL ST – Slip Stitch
FO – finish off
MR – Magic Ring
Stocking Body
This mini stocking is done with traditional granny square clusters in a hexagon pattern. Each cluster is made using three double crochet stitches. Before completing this pattern it is recommended to be familiar with the basic granny square stitch.
Row 1
Step 1: Form a MR, in the center ring CH 3 (this counts as the first DC stitch in the first granny cluster), into the center ring DC 2, CH 2 *3 DC, CH 2* x5.
Step 2: SL ST in the top of the starting CH 3. This should give you 6 DC granny clusters (see image example 1).
Preform color change if desired
Row 2
Step 1: CH 3 (this counts as the first DC stitch in the first granny cluster), in the same CH 2 space (the first corner space), work 2 DC, CH 2
Step 2: In the next CH 2 space, work *3 DC, CH 2, 3 DC, CH 1*, repeat step 2 in each CH 2 space around (6 total clusters when completed).
Step 3: In the last CH 2 space (where you worked the first cluster of 3 in row 2, step 1) work 3 DC, CH 2.
Step 4: Join with a SL ST in the top of the original CH 3.
Preform color change if desired
Row 3
Step 1: CH 3 (this counts as the first DC stitch in the first granny cluster), into the same chain 2 space work 2 DC, CH 2
Step 2: In the next chain 2 space, work 3 DC, CH 2
Step 3: In the next chain 2 space, work 3 DC, CH 2, 3 DC, CH 2
Step 4: Repeat steps 2 & 3 around the piece in each CH 2 space.
Step 5: In the last CH 2 space (where you worked the first cluster of 3 in row 3, step 1) work 3 DC, CH 2.
Step 6: Join with a SL ST in the top of the original CH 3. FO with a long tail to sew the piece together in the shape of a stocking.
The finished piece should resemble a hexagon.
If you would like a larger size mini stocking, continue working rounds until it reaches the desired size.
Stocking Body Assembly
Step 1: Fold the granny hexagon in half (see example below) and use a tapestry needle to sew together the long sides and 1 short side.
Step 2: Leave one short side open (this will be the top of the stocking).
Border
Step 1: Attach yarn to first stich next to the long seamed end and chain 2. Make 1 DC in each stich around and join with a SL ST in the top of the original CH 2.
Step 2: To create the loop to hang the stocking, CH 10 and attach to the original CH 2 space with a SL ST. FO and weave in any ends.
Completed Stocking
**This pattern is FOR PERSONAL USE ONLY. The pattern (or parts of it) may not be reproduced, distributed or resold, translated, published, altered, shared or posted (for sale or free) over the internet or offline. You can sell items made from this pattern, provided they are handmade by yourself in a limited number and you give credit to the designer. Please Credit Alysia Sly at Co-op Creations SD as the designer. If you share online, please tag me; I would love to see your finished creations!**
This cauldron tapestry looks great hanging on a wall or door and adds some witchy decor to your house or office!
Scroll down for the free pattern, or visit my Etsy or Raverly shop to purchase a downloadable copy!
The entire piece is done with the Tunisian Simple Crochet Stitch.
Tunisian crochet is worked similarly to knitting and has a forward pass and return pass row. This pattern requires a basic understanding of Tunisian Crochet techniques. If you need a tutorial, there are lots of good examples available online!
I also recommend being familiar with yarn color changes in crochet projects as there are quite a few color changes in this project. For an easier time with colorwork, divide some of the colors into multiple balls of yarn to add separately. This will keep the back of the piece neater.
Materials Needed:
4mm Tunisian Crochet Hook
4mm Standard Crochet Hook
Tapestry Needle
Worsted Weight Yarn in Various Colors (I’m using 5 different colors of Red Heart yarn)
Scissors
Wooden Dowel (to hang the tapestry)
Abbreviations
CH – Chain Stitch
SC – Single Crochet
TKS – Tunisian Knit Stitch
FP – Forward Pass (for Tunisian Crochet)
RP – Return Pass (for Tunisian Crochet)
YO – Yarn Over
SL ST – Slip Stitch
FO – finish off
Wall Hanging (Main Piece)
All loops remain on the Tunisian Crochet hook until the return pass. It’s very important to ensure your tension throughout the project remains the same. Tunisian crochet projects tend to curl up at the bottom naturally. This is fixed easily by wet blocking the finished project (before adding tassels). You can roll the completed project in the reverse of the way it curls to help flatten it out as well. The single crochet border also helps with flattening out the finished piece.
Row 1: With light gray yarn, Chain (45)
Row 2 (FP): Insert your hook into the second chain from the hook. YO and draw up a loop. Continue drawing up loops from each CH stitch until you reach the end of the row. You should have 45 loops on your Tunisian Crochet Hook at the end of this row. (45)
Row 2 (RP): YO and draw through 1 loop. *YO, draw through 2 loops*, Repat from * until you reach the end of the row. You should have 1 loop remaining on your hook at the end of the return pass. This counts as the first loop for the next row. (45)
Row 3-5 (FP): Insert hook under the second vertical bar the previous row, YO and draw up a loop. Repeat across the rest of the row. In the last stitch of the row make a Tunisian Knit Stitch (TKS) (Insert hook between the two halves of the vertical bar and pull up a loop). This step isn’t necessary, but it helps keep the sides nice and even. Otherwise you can use a standard Tunisan simple stitch in the last stitch. (45)
Row 3-5 (RP): YO and draw through 1 loop. *YO, draw through 2 loops*, repeat from * until you reach the end of the row. (45)
The colorwork portion of the pattern starts on Row 6. Follow the picture chart. For larger sections of color work, I recommend dividing the background color into two different balls of yarn so you don’t need to carry as much yarn behind the work. To add in a new color to the project, pull up a loop in the next vertical bar with the new color. When completing the return pass remember to switch back to that new color when you reach that section of the color work. Row 6 forward and return passes are also written out fully as an example on how to add in color changes.
Row 6 (FP): Insert hook under the second vertical bar of the previous row, YO and draw up a loop. Repeat until you have 12 loops on your hook (light gray yarn). YO and draw up a loop with BLACK yarn – repeat x2. YO and draw up a loop with light gray yarn – repeat x17. YO and draw up a loop with BLACK yarn – repeat x2. YO and draw up a loop with light gray yarn – repeat for the rest of the row, making a TKS in the last stitch of the row. (45)
Row 6 (RP): YO and draw through 1 loop. YO, draw through 2 loops until you reach the stitch before the BLACK colorwork. YO with the BLACK yarn and pull through the 1 light gray loop and the next black loop. YO with the BLACK yarn and pull through 2. With light gray yarn, YO and pull through 1 black loop and 1 light gray loop. YO and pull through 2 loops until you reach the BLACK colorwork. YO with the BLACK yarn and pull through the 1 light gray loop and the next black loop. YO with the BLACK yarn and pull through 2. With light gray yarn, YO and pull through 1 black loop and 1 light gray loop. YO and pull through 2 loops until you reach the end of the row. (45)
Row 7-58 (FP): Insert hook under the second vertical bar the previous row, YO and draw up a loop. Repeat across the rest of the row, making any necessary color changes. Make a TKS in the last stitch. (45)
Row 7-58 (RP): YO and draw through 1 loop. *YO, draw through 2 loops*, repeat from * until you reach the end of the row, making any necessary color changes. (45)
The remaining Tunisian Crochet rows are done without any colorwork changes. Use the same light gray background color used in the first 5 rows.
Row 59-63 (FP):Insert hook under the second vertical bar the previous row, YO and draw up a loop. Repeat across the rest of the row, making a TKS in the last stitch. (45)
Row 59-63 (RP): YO and draw through 1 loop. *YO, draw through 2 loops*, repeat from * until you reach the end of the row. (45)
Row 64 (FP): Please note – there will not be a return pass on this row, this is the cast off row for Tunisian Crochet. Insert hook under the second vertical bar in the previous row, YO and pull up a loop. YO and draw through 2 loops on the hook. Repeat across the rest of the row. FO and weave in all ends.
This is a good time to block the project to get it laying flat as possible. Let dry completely before moving to the next steps. Blocking isn’t necessary, but it helps flatten out natural curl Tunisian Crochet pieces tend to have.
Tapestry Border
Single Crochet Border:
Starting in the first stitch of row 64, attach light gray yarn and CH 1. SC 1 in the same stitch, and SC across remaining stitches in row. In the last stitch of the row – SC 1, CH 2, SC 1. Moving down the side, SC in each stitch (approximately 64 stitches). In the last stitch – SC 1, CH 2. Moving across the bottom of the tapestry, SC in each stitch across. In the last stitch of the row – SC 1, CH 2, SC 1. Moving up the last side, SC in each stitch (approximately 64 stitches). In the first stitch of the row (where you made your original CH 1 to start the row), SC 1 and SL ST to the starting CH 1. FO and weave in all ends.
Left Side Border (Do after crocheting the wall tapestry top section):
Only crochet on the sides of the tapestry. You will not be adding any additional SC on the top or bottom of the tapestry.
Attach green yarn to the left side of the tapestry and SC in each stitch across, including the sides of the tapestry top where the dowel slides through. FO and weave in ends.
Attach black yarn to the left side of the tapestry and SC in each stitch across including the sides of the tapestry top where the dowel slides through. FO and weave in ends.
Right Side Border (Do after crocheting the wall tapestry top section):
Only crochet on the sides of the tapestry. You will not be adding any additional SC on the top or bottom of the tapestry.
Attach green yarn to the right side of the tapestry and SC in each stitch across including the sides of the tapestry top where the dowel slides through. FO and weave in ends.
Attach black yarn to the right side of the tapestry and SC in each stitch across including the sides of the tapestry top where the dowel slides through. FO and weave in ends.
Wall Tapestry Top
Right Insert for Wooden Dowel:
Row 1: Attach yarn in the first available stitch on the right side of the tapestry. SC 8 across. CH 1 and turn.
Row 2-4: SC 8 across, CH 1 and turn.
FO and leave a long tail to sew.
Middle Insert for Wooden Dowel:
Row 1: Skip 10 stitches past the right insert and attach yarn to the 11th stitch. SC 11 across. CH 1 and turn.
Row 2-4: SC 11 across, CH 1 and turn.
FO and leave a long tail to sew.
Left Insert for Wooden Dowel:
Row 1: skip 10 stitches past the middle insert and attach yarn to the 11th stitch. SC 8 across. CH 1 and turn.
Row 2-4: SC 8 across, CH 1 and turn.
FO and leave a long tail to sew.
After completing the black and green side borders, fold each insert down towards the back of the tapestry and attach to the back of the top row with a tapestry needle. This creates loops to slide the dowel through.
Rope to Hang Tapestry:
Starting with a long end, CH 85. FO with a long end to attach to the dowel.
After sliding the dowel through crochet inserts, attach chain rope on either side by forming a loop with the end of the chain and securing with a knot. To keep the chain rope from sliding off the dowel, use a tapestry needle to secure the chain rope to the ride and left inserts. Weave in any ends.
You can also use ribbon or twine as the rope if you prefer!
Tapestry Fringe
Cut pieces of black and green yarn into 14 inch strands. Approximately 38 strands of each color.
Gather the strips in groups of 2 and fold in half (one black strand and one green strand)
Insert crochet hook into the first bottom stitch of the tapestry (this will be the black border stitch, so you will need to insert around the stitch instead of in the top of the stitch).
Pull the group of stitches through the project by hooking the yarn at the middle where it is folded. Only pull through enough to form a loop.
Reaching through the loop, grab the yarn tails and pull them back through the loop.
Pull the tails until the formed knot is snug.
Repeat in every other stitch across the bottom of the project.
Trim tails to desired length.
**This pattern is FOR PERSONAL USE ONLY. The pattern (or parts of it) may not be reproduced, distributed or resold, translated, published, altered, shared or posted (for sale or free) over the internet or offline. You can sell items made from this pattern, provided they are handmade by yourself in a limited number and you give credit to the designer. Please Credit Alysia Sly at Co-op Creations SD as the designer. If you share online, please tag me; I would love to see your finished creations!**
Come to your next game session in style with this Dungeons and Dragons dice bag! This bag hold around 8 sets of regular sized dice.
The dragon graphic is done with the tapestry crochet technique. This technique carries all yarn colors used in the project behind the main color as you crochet. If you’re new to tapestry crochet, there are a ton of helpful videos available on YouTube!
Materials Needed:
4mm crochet hook
Tapestry needle
Scissors
Worsted weight yarn in preferred colors (I am using Red Heart Super Savor Yarn for both colors)
Abbreviations
MR – magic ring
SC – single crochet
BL – back loop single crochet
DC – double crochet
SL ST – slip stitch
CH – chain
INC – single crochet increase
DEC – single crochet decrease
FO – finish off
Bag Instructions
This pattern is worked in continuous rounds.
Row 1: MR, SC 6 (6)
Row 2: INC in each stitch around (12)
Row 3: *1 SC, INC* x6 (18)
Row 4: *2 SC, INC* x6 (24)
Row 5: *3 SC, INC* x6 (30)
Row 6: SC in BL only around (30)
Row 7: SC around (36)
Row 8-26: SC around while color changing according to the below chart. (36)
D&D Dragon Graphic
Row 27: SC around (36)
Row 28: SL ST in first stitch over and CH 2. Make 1 DC in same stitch as the CH 2. Make 1 DC in next stitch, CH 1, skip the next stitch, *2 DC, CH 1, skip the next stitch*; repeat from * and continue around. SL ST in the top of the CH 2 at the start of the round.
Row 29: CH 1, SC in same space as CH 1, SC in each stitch around, making sure to put 1 SC in each CH 1 space. SL ST to starting CH 1. (36)
FO and weave in ends.
Drawstring Instructions
Row 1: CH 60. FO and tie a small knot at the start and end of the drawstring. Weave in any ends.
Weave completed Drawstring through the gaps between DC spaces on bag so the ends are on left or right of the bag when it’s laid flat.
Draw String Cord Stop
Row 1: SC 8 and turn; starting in second chain from the hook, SC 7 across. CH 1, turn.
Row 2: SC 7 across, CH 1 and turn (7)
FO with a 12 inch tail
Folding the piece your just created in half, sew the 2 ends together. Slide the knotted ends of the drawstring through the opening and then press the folded flat piece.
Sew the flat piece completely closes around the drawstring, leave a small pocket open for the drawstring to slide through to cinch and uncinch the bag.
Completed Dice Bag
**This pattern is FOR PERSONAL USE ONLY. The pattern (or parts of it) may not be reproduced, distributed or resold, translated, published, altered, shared or posted (for sale or free) over the internet or offline. You can sell items made from this pattern, provided they are handmade by yourself in a limited number and you give credit to the designer. Please Credit Alysia Sly at Co-op Creations SD as the designer. If you share online, please tag me; I would love to see your finished creations!**
It’s almost Valentine’s Day and that means cute themed plushies! I love adding hearts to my amigurumi pieces this time of the year.
The amigurumi heart fits perfectly in the hands of any small to medium sized plushie. It is also no sew, so it’s extra quick to whip up! It usually takes me about 10-15 minutes to make one.
Materials Needed:
3.75mm crochet hook
Tapestry needle
Scissors
Worsted weight yarn in preferred color (I am using Red Heart Super Savor – Burgundy)
Fiber fill for stuffing (yarn scraps also make a good stuffing for this project)
Abbreviations
MR – magic ring
SC – single crochet
SL ST – slip stitch
CH – chain
INC – single crochet increase
DEC – single crochet decrease
FO – finish off
Instructions
Row 1: MR, SC 6 (6)
Row 2: *1 SC, INC*, repeat x3 (9)
Row 3: SC 9 (9); FO and set aside. Make a second one up to step 3, but do not FO. Continue to step 4.
Row 4: SC 9 around and attach 1st piece with 1 SC. SC8 around rest of 1st piece (18)
Row 5: SC 18 (18)
Row 6: SC 18 (18)
Row 7: *SC 4, DEC*, repeat x3 (15)
Row 8: SC 15 (15)
Row 9: *SC 3, DEC*, repeat x3 (12)
Row 10: SC 12 and add fiber fill stuffing (12)
Row 11: SC DEC x6 (6)
FO, weave tail through 6 stitches and pull tight to close. Weave in ends.
Finished heart attached to a cthulhu plushie
**This pattern is FOR PERSONAL USE ONLY. The pattern (or parts of it) may not be reproduced, distributed or resold, translated, published, altered, shared or posted (for sale or free) over the internet or offline. You can sell items made from this pattern, provided they are handmade by yourself in a limited number and you give credit to the designer. Please Credit Alysia Sly at Co-op Creations SD as the designer. If you share online, please tag me; I would love to see your finished creations!**